Thursday, March 31, 2011

Make It Yourself: Homemade Bread


Here is a picture of some bread I attempted to make last year:


So sad, it didn't rise. I have bread problems. This is another thing I'd love to start making in our house instead of buying.  The nice whole-wheat-big-slice-sandwich-bread we like is pricey!  Yet, the few times I've tried to make nice bread it hasn't worked.  I can do quick breads and rolls but that's about it.  Emma from City Roots, County Life seems to have the whole bread making thing down.  It's hopeful to see other people try and succeed in bread making, perhaps I should try it again?  She's joining the Make It Yourself month with the last post in the series all about bread.  I love what their blog is all about:  "First, it is the story of our transformation from a suburban family to a country family.  But more importantly, we want this site to be both a resource and an inspiration to others who are thinking about making the move out to the country. We truly believe that living in the country is what we’re being called to do, but that doesn’t make it any less scary.  If you’re a family considering making the shift to a more rural, simplified, and self-sustaining life, we hope that our tales here will give you hope that if two city slickers like us can make it work, surely most anyone can."  Check it out and in the meantime here is Emma:


When Danielle asked me to guest post for her series on Make It Yourself, I was completely flattered. I am anything but an expert about making bread from scratch and I've certainly had a handful of failures. However, I've definitely learned that you can't expect to be perfect at something the first (few many) times around and often it's the journey that teaches you more than a recipe in a book will.

That being said, I highly encourage everyone to try making bread, from scratch, at home. I am not really known for being much of a baker, I'm more of a "cooker" as I have a distinct proclivity to change recipes as I go. Baking, however, doesn't really work like that, so I've had to be pretty disciplined about following the recipe. If you do follow the directions, you'll have a blast!

The internet is a wonderful resource if you're looking to dive into bread making. There are hundreds and hundreds of recipes out there and as many blogs dedicated to explaining how and why baking works the way it does. So far I've stuck to recipes that were specifically recommended to me or found poking around online. A couple you might try are listed below and contain links to my specific posts with photos, notes, and the original recipe:

Crusty White or Wheat Bread

Artisan Bread in 5 Minutes a Day

Amish White Bread


Here are a couple of tips that I have picked up so far:

  • Read the directions. The entire thing. Start to finish, so you know what to expect. I always neglect to realize how long it takes when you include mixing, rising, punching, forming, and rising again. Look at your schedule and plan it out. If you want fresh bread with dinner at 6pm, you probably need to start before 3pm unless you've got the Artisan dough in the fridge. Plan ahead and make sure you have your ingredients together.

  • If you live in a cool climate (or it's winter), have a warm place you can let your dough rise. Our thermostat is usually set about 72* so that's plenty warm for my bread to rise nice and high. If you leave your inside temperature around 50* though, you'll need to plan ahead! I've read of people turning the oven on "warm" and letting it preheat a few minutes, then prop the door open and let your bread rise in there.

  • Preheat the oven. Give your oven a solid 20 minutes to preheat so the temperature is even and prepared for your loaves. It makes a big difference.

  • If you want a crunchy crust, take a small pan (I use an 8x8" brownie pan) and put it in the oven on the lower rack while preheating. When you put the loaves in the oven, pour a cup of hot water into the brownie pan. It'll bubble and steam and help create a crispy crust on your bread.

  • Give your bread at least a little time to cool. We have a tendency to want to break into the loaves as soon as they're out of the oven. While nothing beats bread still hot from the oven, the loaves will hold together better and slice easier if you let it cool a bit.

  • The next time you buy bread from the store (I still do it, I haven't replaced all our bread-eating yet), save the large plastic bags and twist ties that they come in. My loaves tend to be too large to fit in a ziploc bag neatly and it's handy to have bread-sized bags stashed in the pantry for use. Just dump out the crumbs and you can reuse them over and over again. Homemade bread doesn't have the preservatives in it to keep it moist, so if you're storing any over night (and especially if you live in a drier climate, keep the bread in a bag until use. You will lose some of the crispy crust, but I'd rather have moist bread than crunch.

  • And lastly, keep trying! Everyone has their own preferences on how they like their bread -- light and fluffy, dense and dark. Sourdough. Buttermilk. Herbs. White or wheat. I try to make a recipe three times before putting it on the shelf. This way I can (hopefully) isolate a mistake on my side and know if I really care for the recipe or not. I haven't found my all-time-favorite yet, but I am a fan of the artisan bread and have a batch in the fridge as we speak.

If you're looking to save money, making your own bread at home is a great way to do that! There are 4 basic ingredients in bread recipes, plus an extra here or there depending on the variety (ie - often sugar or honey). Here's the basic cost break down:

  • Most recipes call for between 5 and 6 cups of flour. If you're just using standard, generic, all purpose flour this comes out to about 2 pounds. Add in some spillage, flour to dust your counter tops and rolling pin, and you can easily get 2 batches out of a 5 pound bag of flour. At about $2.50 per bag, that's about $1.25 in flour per recipe (often for 2 loaves). If you go through a lot of flour, you can get a 50 pound bag from a bulk warehouse store for about $11.50. That drops your per-loaf flour cost to $0.60.
  • Yeast in individual packets are running $1.45 per pack of 3 here, so adjust for one or two packets per recipe depending on how much yeast is called for. Again, bulk is your friend and two pounds of yeast will run you $3.99 and make umpteen (likely hundreds of) loaves of bread and save you big time on your yeast expense.
  • Water -- basically free from the tap. I'm not even sure how to calculate the cost for 3 cups of water. =P
  • Salt -- A standard sized (26 ounce) canister of salt from the grocery store runs right at $1.00. You can get bulk non-iodized salt for $3.45 for 25 pounds, so your 1 -2 Tablespoons of salt will cost you pennies ... maybe.

When it's all said and done, you'll probably spend about $2.00 for 2 loaves of bread if you're buying standard items from the grocery store -- closer to $0.80 or $1.00. Comparing that to $3.29 for a standard, boring, store-bought loaf of bread and you'll save money nearly every time. And make your house smell wonderful in the process!

I hope this has encouraged you to hit up your pantry and make some bread! Remember, it doesn't have to look perfect to be delicious, to make your house smell divine, and to make a killer french toast for breakfast. =) I've love to get some feedback from you if you take the plunge!

Tuesday, March 29, 2011

Make It Yourself: Ice Cream


We attempted to make our own ice cream last year and it didn't work so well.  It was messy, expensive and hardly ever worked right.  It was discouraging - we ended up selling our ice cream maker and continue to this day to buy store bought.  With summer coming though I'd like to break the habit and start making our own again.  Robin from Our Semi Organic Life may have encouraged me.  She and her husband make homemade ice cream and just seeing the pictures on her blog made me want to run out and buy a new ice cream machine.  I was thrilled when she said she would share her ice cream making experience this month on Make It Yourself.  Along with making ice cream Robin also posts about their newlywed life being healthy, happy with laughter, cooking & their cat on her blog.  Check it out!  

Here is Robin:

Ice Cream 1

A scrumptious DIY ice cream is easy to make and can be really fun!  We've tried a bunch of types of recipes but like this one the best!  Since we're going somewhat dairy free in our household we made ours with 'So Delicious' brand vanilla coconut milk.  You can use regular milk.

We love making homemade ice cream and haven't purchased store bought stuff in years!  We like how you can control what goes in it and since we're 'semi organic' we like to add as many organic ingredients as we can.  That means every time it's different and awesome!  Another thing that's great is how cheap it is!  Just check out the freezer section at your local store and gasp at how much some people pay for tubs full of chemicals and factory made flavors.  Don't be a sucker!  It's really easy and normally you'll just need to grab extra milk since you may already have the other ingredients.

ice cream 2

Chocolate Ice Cream Recipe:
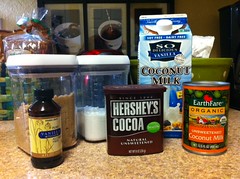
  • 1 cup unsweetened cocoa powder
  • 2/3 cup granulated sugar
  • 1/2 cup firmly packed brown sugar
  • 1 1/2 cups 'So Delicious Coconut Beverage'
  • 3 1/4 cups (about 2 cans) Coconut milk (not light coconut milk)
  • 1 tablespoon pure vanilla extract

Before starting, make sure you follow your machine's instructions, which usually includes freezing the mixing bowl overnight! 

Place the cocoa & sugars in a bowl & stir. Add the So Delicious and use a mixer or whisk to combine until the solids are dissolved (about 1 min).

ice cream 3

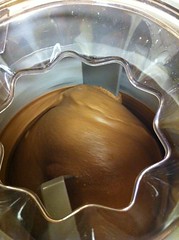
Stir in the coconut milk & vanilla. Turn on ice cream machine & pour the mixture into the frozen bowl.  It takes about 20-30 minutes until it's soft and creamy. At this point it's perfectly edible!  For a firmer texture, transfer to an airtight container & freeze for 2 hours or more. Remove from freezer 15 minutes before serving.

ice cream 4
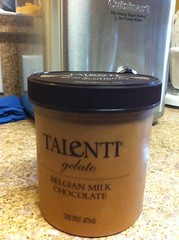
We packaged it in a leftover plastic ice cream
tub from another gelato brand called Talenti.

Enjoy!


Thursday, March 24, 2011

Make It Yourself: Sandwich Bag Dryer


Regardless of what I do we always seem to have plastic sandwich bags.  I'd really like to break our habit of using them and although we have cut back we still end up needing one every now and then.  One thing that helps is washing the ones we do use for dry goods or non-meat products and reusing them.  This way they are at least getting more than one use before being thrown away and we buy them less often.  I didn't have a way to dry them so the dirty ones were stacking up in the sink.  I looked into purchasing a dryer like this one but most of the reviews I read said that eventually the wood will mold or rot because of the water, most are made in China and they can be pricey - some over $20.00 with shipping.  Then I came across this video by Michelle Kaufman - eco home designer.  I had to try it for myself.  I'm happy to say that it works!  I haven't been throwing bags away and have been cleaning and reusing the ones I have.

Supplies:


Wire - I used 16 Gauge Steel Galvanized Wire but Michelles Kaufman used wire coat hangers
Pliers
A few small flower pots
Seeds or plants to go in your pots

Directions:


Start by taking about 1 foot of your wire.  You can either just fold over one end to make a small circle, being sure to tuck in your cut end, or you can get crafty and make a design on the end - I made little flowers.

Next, stick these in your flower pots.

That's it!  After washing a bag, just place it upside down over your metal wire.  The water will drip down into the flower pot and eventually dry.


The cost breakdown:

So, is it worth it to make your own sandwich bag dryer or buy one at the store?

Pliers - free (almost all households have these - if not, just use your hands)
Flower pots / flowers - If you don't have any small pots you can usually buy these at any garden or superstore for less then 2 dollars.  I was able to get individual plants at Ace Hardware for $1.00 a piece which included enough dirt so I didn't have to buy that.  So I estimate that if you got 4 pots at $1.50 each and 4 flowers at $1.00 total this would cost about $10.00
Wire - You can use wire coat hangers if you have them - that's free.  If not, buy a galvanized wire (so it won't rust).  I was able to find this online for $5.49 but you can also buy this at many home improvement stores.

Total the most you would spend on this is $15.49 and depending on how big your flower pots are you should be able to fit about 2-3 wires in each pot leaving you with about 8-12 arms for drying bags.  I used flower pots and flowers I already had so really I only had to buy the wire, but like I mentioned you could just use an old coat hanger and then you wouldn't have to purchase anything.

VS.

Gaiam Countertop Plastic Bag Dryer which is $17.71 on Amazon.


The bottom line: if you bought everything from scratch you may only save a few dollars, however I think that the flower pot idea is more appealing - I have four pots with bag dryer wire in them sitting in my kitchen window and I just love how it looks.  You could even make them more useful by growing herbs to cook with in them.  Also, we have been trying to purchase things made in the USA or avoid buying something made in another country together so being able to make it is really nice.  Again, if you have a few flower pots and a coat hanger you get away with not purchasing anything and then you'd save almost $20.00.  Just another thing you can make yourself!

Tuesday, March 22, 2011

Make It Yourself: Homemade Cards


I really enjoy making homemade cards.  They seem much more personal and nice when they are homemade.  I've been making homemade cards ever since I got a Cricut.  However, you don't need a Cricut to make homemade cards.  A few cards I have made with just paper and scissors, like my Red Hot Birthday Card and Graduation Hat Card.  If you don't have a Cricut or paper crafting machine you can also simply use stamps to make a nice card.  It is nice to be able to personal each card, have them handy when you realize at the last minute you need one and they are cheaper then store bought cards.  My mom often sends us cards she makes using just blank cards and stickers.

The cost breakdown:

Pack of 50 blank cards and envelopes: $9.92 Amazon.com
5 packs of 10 sunflower stickers (Sticko):  $1.29 per pack = 5.16 Scrapbook.com
Markers - free

Use one sticker on the front of each card and then write or print with a computer what you intend the card is for, i.e. Happy Birthday!,  Celebrate!,  Congratulations!, Get Well Soon... etc.   This will make 50 cards at the cost of roughly $15.08.  That's about $0.30 a card.

VS.

I found this as an example of how much you'd pay for a store bought card that is similar.  That's over a dollar in savings per card. I will admit that some of the cards I have made are time consuming and also probably close to the price of store bought cards in supplies however I use a lot of my left over or miscellaneous paper supplies for my cards that would otherwise be thrown out.  Blank cards aren't that expensive to make though and are easily customizable - I don't think you can beat a homemade card.

Thursday, March 17, 2011

Make It Yourself: Suet Feeder Plugs


I love my birds.  They are fun to watch on Sunday mornings with a cup of coffee and I always have my eye open for a species I haven't seen yet.  A moving present we got from my mom when we first moved into our house was a woodpecker suet plug feeder.  These are great for woodpeckers that cling and so far it has attracted nuthatches, tufted titmouse, downy woodpeckers and red-bellied woodpeckers.  The birds like it so much that they go through the plugs weekly and it was getting expensive buying refills.  I opted to try and make my own.  It was much easier and less messy than I thought it was going to be, plus very cost effective and is actually fun to make!  A fair warning:  after smelling the peanut butter, seeing the flour and oats you may be tempted to also make a batch of cookies when you are done making suet.


Ingredients:


4 cups of crunchy peanut butter
4 cups of lard
8 cups of quick cook oats
8 cups of corn meal
4 cups of flour


Directions:


In a large bowl, melt peanut butter and lard together until smooth.  I did this in the microwave, but you can also do it over the stove.


After they are melted, add corn meal, flour, and oats.  Add any extra nut pieces or raisins at this point too.


Stir and mix until well blended.


Using an old plug container or your hands, mold some of the mixed suet into round plugs.  Pop out of container and wrap in wax paper.


I wrapped 3 plugs together each wax paper roll because my feeder has 3 plugs and then I can just grab a wax wrapper and be good to go.  Put the wrapped plugs into a large freezer bag and freeze until ready to put into the feeder.  You can also use this recipe to make suet cakes just freeze them into square cakes using free hand or an old suet cake container. 


The cost breakdown:

This is what I paid at the store:

Kroger brand 4 lbs/64 oz) of Peanut Butter (7.12 cups) = $5.79 or $0.81 per cup
Kroger brand 100% Whole Oats Quick Cook 42 oz (7.5 cups) = $2.99 or $0.40 per cup
Kroger brand Yellow Corn Meal 24 oz (4.69 cups) = $1.00 or $0.21 per cup
Gold Medal White Flour 5lbs (20 cups) = $2.35 or $0.12 per cup
Armour Lard 40 oz (5.44 cups) = $4.49 or $0.83 per cup

Total it cost $11.92 to make my batch of suet and that made me 53 plugs which totals to about $0.22 per plug.

VS.

Peanut Delight Suet Plugs (4 pack) = $2.39 This is about $0.60 per plug.

If I bought 53 plugs at this price it would cost $31.80.  That's a savings of $0.38 per plug. or $19.88 per batch of homemade suet!  If you go through it as much as I do, it's much more economical to make your own!

Wednesday, March 16, 2011

St. Patrick's Day Stout Cupcakes


Yes, that's right, stout cupcakes with a stout sugar icing,
and they actually have real beer in them.  

Happy St. Patrick's Day everyone!

Tuesday, March 15, 2011

Make It Yourself: Breakfast Granola


This is a combination of several of my favorite granola recipes that I love.  It's so nice to be able to make a large batch of this and have it in the pantry ready for breakfast or a snack.

Ingredients:

3 1/2 cups rolled oats
1/2 cranberries
1/2 cup raisins
1/4 cup shelled sunflower seeds
1/4 cup flax seeds
1/4 sesame seeds
1 teaspoon ground cinnamon
1 teaspoon ground ginger
1/2 cup light olive oil
1/2 pure maple syrup
1/2 local honey

1. Mix together oats, cranberries, raisins, sunflower seeds, flax seeds, cinnamon, and ginger.


2. Once mixed, add oil, syrup and honey.

3. Mix very well.

4. Evenly spread onto a large baking pan that is lined with aluminum foil.

5. Bake at 300ºF for 30-40 minutes until it starts to become fragrant and is slightly golden in color. Don't over cook!


6. Let cool for 5 minutes then break off into pieces or crumble.  Store in a airtight container.


I'm not sure if it's cheaper to make granola at home than it is to buy it pre-made at the store but I assume it is.  Even if it isn't, or close to the same price, I enjoy making granola because I can add whatever I want to it (nuts, dried strawberries, etc), or whatever I have extra in the pantry.  I also like that that I can control what type of sugar goes into our cereal.  Of course, this year I've been able to make some with our own maple syrup which has been wonderful and it's so nice to be able to use that and know that we aren't eating granola with high fructose corn syrup.  Not only is is great for our family but a few years ago my mom made several batches of her homemade granola for Christmas presents which I think I may have to do this year.

Saturday, March 12, 2011

Spring garden

Radish seedlings

Our spring gardens are coming up like weeds.  We've had nice warm weather and a lot of rain so I think that helps.  Here in Tennessee we were able to plant our cold spring garden in February and it's amazing to me that possibly by the end of this month we'll have radish, lettuce and spinach.  We also planted snap peas but they take a little bit longer to produce although they are sticking out of the ground already too.  We invested this year and purchased 6 Mary Washington asparagus plants and 3 Jersey Giant asparagus plants along with 2 rhubarb plants that are now in the ground also.  These are a gamble as we've learned both are hard to grow in Tennessee because of the hot temperatures and humidity levels.  Both take several years to produce anything so we'll see what happens.

Brandywines growing in the Aerogarden

The seeds we started indoors have all come up as well.  We have 6 Brandywine tomato plants, 6 Amish Paste tomato, 4 Lemon Drop Cherry tomato, 1 eggplant, 3 Golden Flame peppers, and 3 hot peppers that are all up.  We may decide to weed down the tomato plants because we don't have room for 16 tomato plants!  Too many is better then not enough though.  Pretty soon I'll transfer them from my Aerogarden to pots and then after April 15th, to the ground. 

Peppers peeping up

And last but not least I had my first bulb bloom this past weekend!  I was the last on the block to bloom but it was worth the wait.  Now I have several blooming daffodils and crocus.  I can't wait to see what the tulips will look like.

My first daffodil of 2011

Thursday, March 10, 2011

Make It Yourself: Drain De-Clogger


We have 3 cats and 2 humans in this house and drains seem to clog overnight here.  In our last apartment we had a septic tank so I had to find a more natural way to unclog sink drains then with the store bought chemicals.  I'm not sure where I got this recipe but it works.  I've used it for over 2 years now to unclog sink drains and haven't had to buy any of the store stuff which is nice since that stuff is hard on septic systems and pipes and probably shouldn't be allowed in the water system at all anyway.

Ingredients:

Baking soda
White vinegar
Boiling water


Directions:

1. If unclogging a bathroom sink, take the stopper out.  Make sure all the water is drained from the sink.

2. Fill the drain with baking soda.  I usually use about 1/4 to 1/2 a small box to do this.  Shove it down the drain if you have to using a long spoon.  Really pack it in.

3. After baking soda is packed in drain, dump 1/2-3/4 of a cup of vinegar in the sink.  It will start to foam up and eat the baking soda.  Allow the vinegar to 'bubble' and foam its way down the drain.  Be patient - this can take awhile.

4. When you don't hear the bubbling anymore, flush the sink with a kettle full of boiling water.  It will take a minute but your drain should run smoothly after the boiling water is gone.  Run your sink and test it out.

Note:  Sometimes for a bad clog, I will repeat steps 2 and 3 twice before adding the boiling water.


The cost breakdown:

1 gallon of white vinegar - $1.99
16 oz box of baking soda - $1.00
Boiling water - free

If I estimate high by saying that I'll use 8 oz of baking soda and 1 cup of vinegar per drain de-clog that costs about $0.62 per application.

VS.

Draino Foam Clog Remover - $7.50

These prices are based on our local supermarket and don't included taxes, but if you use homemade drain clog remover as opposed to the store bought you could save almost $7.00 per application.  That's a lot!

Be sure to join us next week were I'll be shifting gears from cleaning supplies to food items that you can make yourself!

Tuesday, March 8, 2011

Make It Yourself: Vanilla Meyer Lemon Tooth Powder


For the last 6 months or so we have been testing out natural and or organic toothpastes from the supermarket.  Some of them have been great but all of them have been expensive.  Super expensive.  And I swear they are less oz then regular toothpaste because they only seem to last about three weeks.  I've thought about making our own but was weary of using glycerin which most toothpaste recipes call for.  Then I came across this post from Chiot's Run by Susy.  Oh how badly I want to try this!  It sounds so easy and yummy and cost affective!  We plan on making some next go around and I can't wait.  I asked Susy if she would be willing to share the recipe as a guest blogger on Make It Yourself Month and she said yes.  Be sure to visit Chiot's Run where she blogs about all kinds of things including more make-it-yourself items like homemade crackers and hard cider!


Here's Susy from Chiot's Run:

Vanilla Meyer Lemon Tooth Powder

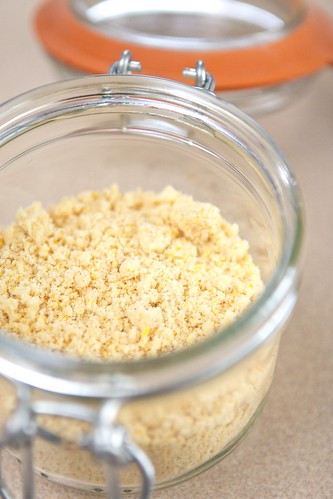
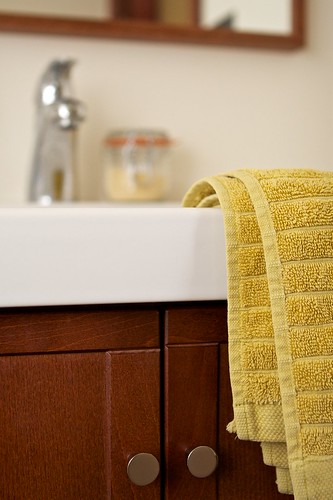
I blogged about making homemade toothpaste last October. That recipe used vegetable glycerin, which Mr Chiots and I weren't really fond of. After we used up that batch we've been using tooth powder instead, which we like much better. I've been trying different recipes, cinnamon tooth powder being our favorite so far. Since it was time to make another batch, I decided lemon would be a wonderful flavor for the coming spring months. I made up a batch of Vanilla Meyer Lemon Toothpaste. It smells heavenly, like a delicious lemon cookie. The recipe for toothpowder is basically the same, you can add various essential oils and spices to customize it to suite your tastes.

Homemade Vanilla Meyer Lemon Tooth Powder

LEMON VANILLA TOOTH POWDER
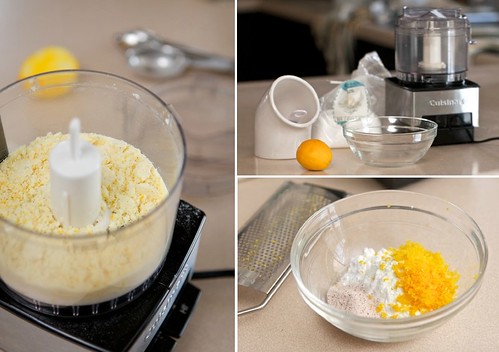
4 Tablespoons baking soda (I use aluminum free)
2 teaspoons fine sea salt
1 Tablespoon of grated lemon peel (from one lemon)
10 drops of vanilla

Stir together ingredients and whir in a food processor to pulverize the lemon peel. Store in a small jar. Put small amount on toothbrush and enjoy and non-toxic delicious tooth brushing experience! As with all tooth brushing make sure to rinse well after brushing, especially with the citrus as it's slightly acidic. Rinsing well gets rid of the acid.

For my cinnamon recipe I simply omit lemon peel and vanilla and add 1 teaspoon of ground cinnamon. Sometimes I also add a few drops of peppermint essential oil.


Homemade Vanilla Meyer Lemon Tooth Powder

This recipe is simple to make and really inexpensive as well. An SLS free non-toxic toothpaste can run $4-10 per tube, since this costs less than 50 cents per batch you're saving a bundle!

Homemade Vanilla Meyer Lemon Tooth Powder

I really enjoy learning to make things for myself so I don't have to rely on heading to the store when I need things like toothpaste, brown sugar, bread, crackers and other things. All you have to do is keep a few staples in your pantry and you can save a bundle buy learning to make your own.

Have you ever made homemade toothpaste or powder?

I can also be found at Chiot's Run where I blog daily about gardening, cooking, local eating, beekeeping, and all kinds of stuff. You can also find me at Not Dabbling in Normal and Simple, Green, Frugal, Co-op, and you can follow me on Twitter.

Thursday, March 3, 2011

Make It Yourself: Automatic Dishwasher Detergent


I promise that not all the make-it-yourself topics will be about detergents but having just recently tried this and think it's wonderful I thought it was a must for Make It Yourself Month.

In the three years that my husband and I have been married we have never had a dishwasher.  When we moved into our new house here in Tennessee it had a dishwasher!  It was like 'ta-da!'  I've done a lot of research on washing dishes by hand verses washing dishes in the dishwasher and which is better and I found evidence for both.  I guess it really depends on the machine you have and the person washing the dishes.  Our new dishwasher is nice though because it is energy rated and comes with a pamphlet telling you how many gallons per cycle it uses in water.  Compared to what I estimate I use washing dishes by hand, we opted for using the dishwasher for the most part.  Problem is the detergent.  I don't trust the regular store bought stuff just like I don't like laundry detergent.  The scents, colors and chemicals... no thanks.  And the brands that sell 'better' detergents with no scents or colors are often really expensive.  So I found a simple recipe for homemade automatic dishwasher detergent and it seems to work great so far.


Ingredients:

Borax
Washing soda


Directions:

Mix equal parts borax and washing soda in a container with a lid (i.e. 1 cup of each).  Use two large spoonfuls in the detergent container in your dishwasher per load approximately 2 tablespoons.  Run your cycle as normal.


The cost breakdown:

Based on our local grocery store:  a 76oz box of Borax is approximately $4.30, a 55oz box of washing soda is approximately $2.99 and a 45oz box of Seventh Generation Automatic Washing Detergent is $8.99.  That means that if I made 2 cups of my homemade detergent it would cost approximately $0.88 and 2 cups of the Seventh Generation detergent would cost about $3.20.  I use the same amount of detergent when I'm doing dishes in my machine for both homemade and the store bought so that's a savings of over $2.00 per 2 cups of detergent!

Thanks to my new best friends, borax and washing soda, I now can clean my dishes in my dishwasher cheaper and hopefully it helps the water system a little bit by not adding chemicals and whatever else is in the store bought stuff.  This is great too because if you already make the homemade laundry detergent, you have everything you need to make it!

Tuesday, March 1, 2011

Make It Yourself: Laundry Detergent


I posted this a year ago but I so strongly think everyone should make their own laundry detergent that I'm going to post it again:


I haven't bought laundry detergent for over two years and it's been wonderful - not shelling out cash for the expensive store bought laundry detergent that seems to last about 4 loads or having to wash our clothes in chemicals that is suppose to smell like something nice but instead makes me nauseous.  Instead we make our own detergent.  We got the recipe at The Simple Dollar and haven't looked back.  I love it because 1) It's way cheaper then buying the store bought stuff - they figure about $0.03 a load and 2) Because you control what goes in it.  After using our own stuff for over two years now, I highly recommend it.

Recipe:

• 1 bar of soap
• Borax  - can be found in a box in the detergent isle
• Washing Soda (I use Arm & Hammer) - can be found in a box in the detergent isle
• 5 gallon bucket
• 3 gallons of water plus 4 cups
• Cheese grater or food processor

1.  Shave your bar of soap with the cheese grater or food processor until you have a nice pile of soap.  You can use any soap - we've used left over bars from the tub, Zote's Laundry Soap, Levers 2000, and many more - they all work great, however I tend to like Zote's Soap because it's the best bang for your buck.  It's nice to be able to make your own detergent because you can choose to use soaps that are made from goats milk or soap that have little additives like sent and color.

2.  Boil 4 cups of water in a large pan.

3.  Add your soap shavings to the pan and stir them until they melt.

4.  Turn your heat off and add 1 cup of washing soda to the water and 1/2 cup of borax.  Stir.

5.  Add 3 gallons of hot water to your 5 gallon bucket.

6.  Add your pan of soapy water to the five gallon bucket and give it a stir.

7.  Cover and let sit for 48 hours.

8.  Your soapy water will turn into a gel of sorts and this is your new detergent!  I use 1 cup for every load of laundry.


It's better for your wallet, the water, the environment, and your clothes.  Combined with our own detergent we also use  Nellie's PVC Free Dryer balls instead of dryer sheets.  They last two years and cut down on drying time when I can't dry clothes outside.   They also don't add chemicals to your freshly cleaned clothes. I've also been adding about 1 cup of white vinegar to some loads during the rinse cycle.  The vinegar acts as a natural fabric softener for larger items to wash like sheets and also dissolves pet hair.  I can swear that I notice a difference in cat hair with loads that I wash with vinegar and those that I don't, but my mom also tried this and couldn't tell... either way, your clothes won't smell like vinegar so you don't have to worry about that.

Making your own laundry detergent is fun - now go make some yourself!