Showing posts with label Food. Show all posts
Tuesday, July 19, 2011
Tomato Egg Sandwich
Best way to enjoy our first slicer this summer? Tomato egg sandwich with a Brandywine from the garden, an egg from our chickens and homemade bread. Yum.
Wednesday, July 13, 2011
Peaches, blackberries and relish, oh my!
Did I say lazy weekend? I spoke too soon. We stopped at a roadside market just south of where we live and picked up 1/2 bushel of South Carolina peaches and three pints of blackberries. I pretty much ate blackberries all day. They were to die for. The peaches were excellent too. We even got to keep the basket they sold them in which will be a nice garden basket for collecting our crop from the day along with eggs. We then spent most of Sunday peeling peaches and canning. I've never had much luck peeling peaches without them ending up a big mushy mess but I think this time I figured out a trick. Instead of just boiling the peach for 30 seconds then dunking it in cold water, I made a small cross in the skin with a knife before boiling it. Seemed to help. Anyone else have any good tips for peeling peaches?
We ended up with eight quarts of peaches in light syrup (one of my favorite things to eat on yogurt for breakfast in the winter) and six half pints of blackberry jam. We also had an abundance of cucumbers and hot peppers from the garden so Lewie made a batch of hot cucumber relish. He kinda used a few recipes and went along with what we had so it ended up having shredded cucumber, hot peppers, onions, celery, mustard seed, celery seed, canning salt and apple cider vinegar. Have yet to try it, but the smell was wonderful and looks so pretty in the jars. I'm sure it will be good on a brat or sausage.
Saturday, July 9, 2011
Garden fresh salsa
What's better then a lazy weekend? A lazy weekend with homemade salsa.
We made a nice salsa with ingredients from our garden: cherry tomatoes, mystery tomatoes (more on this later), roma tomatoes, a hot pepper, a green pepper and cilantro. The only thing in our salsa not from our garden was garlic and salt. Just threw them in the food processor and yum it was tasty.
One of the joys of summer!
Tuesday, July 5, 2011
Garden progress: June
It's really amazing how fast our garden grew in June. So far we have had two large cucumbers, an eggplant, handfuls of lemondrop cherry tomatoes, three roma Amish Paste tomatoes, and one green/yellow sweet pepper. We continue to watch everything grow daily. We have a few watermelons that are about the size of a pea and tons of Brandywines that seem like any day will turn red. It's so rewarding to eat a salad or meal that came mostly from our garden. Last week we had greens with cherry tomatoes, cucumbers and peppers and an eggplant melt with pesto made with basil from my herb garden. It was wonderful. Pretty soon we should have green beans and hot peppers. We also planted more carrots and lettuce.
Monday, July 4, 2011
Fireworks Cookies
Happy Independence Day! I made fancy firework cookies to celebrate via Martha Stewart Living. They didn't come out nearly as good as hers but they still taste good!
Monday, May 30, 2011
Happy Memorial Day - banner and sign
Happy Memorial Day everyone! We celebrated yesterday with a pig roast and lots of friends. I made a few signs to help celebrate using my Cricut. I used the Country Life cartridge and the banner feature, which I love by the way, to make the banner and using the extra cutouts from that I made the simple sign above.
Hope everyone had a safe and enjoyable Memorial Day weekend!
Monday, May 23, 2011
Spinach recipe roundup
What happens when you don't pick spinach for almost two weeks? You end up with spinach coming out of your ears! I picked piles and piles of it this past week and decided to cook most of it down for freezing. We use frozen spinach a lot in our house and during winter this will sure be handy. To freeze spinach simply wash it, put it in boiling water for 2 minutes, transfer to ice water until cool and then let drain. Place in a freezer bag and freeze.
I really love spinach but now that we have so much I seem to be blanking with what to make with it. That's why I love bloggers. Of course there are always salads but here are some other fabulous ways to use spinach:
- Spinach and Swiss Quiche from A Foothill Home Companion which can be found on the blog entry, Have Another Slice
- Morel Mushroom Souffle with Spinach from ChezWhat? which can be found on the blog entry, Morel Mushrooms Three Ways
- Farmgirl Susan's Super Spinach Soup from Farmgirl Fare which can be found on the blog entry, You'll Wanna Eat Your Spinach Soup, Ba-by After You Try This Easy & Delicious Recipe!
Sunday, May 15, 2011
Strawberry picking & recipe roundup
This past week we went to a local farm, The Fruit & Berry Patch, to pick this seasons first harvest: strawberries! I've been craving strawberries lately so on a nice day with great weather it seemed like the perfect thing to do. The farm was littered with little red berries all over and it was so hard not to just sit there and eat them.
We left with almost 52 lbs of strawberries! Here is what I made with some of our bounty this year:
Old Fashioned Strawberry Jam and canned Strawberry Rhubarb Pie Filling via Ball Complete Book of Home Preserving
Strawberry fruit roll ups via Jam It, Pickle It, Cure It: And Other Cooking Projects
Strawberry Icebox Pie via Martha Stewart's New Pies and Tarts: 150 Recipes for Old-Fashioned and Modern Favorites
I also have a batch of strawberry vinegar aging in the basement that should be ready in about four weeks to can. I made this two years and it has become a household favorite. All I do is mix some of the vinegar with sour cream and ta-da, instant strawberry salad dressing! I dried about three cups of strawberries for future use in granola as well. With the rest I just froze them for use in smoothies, more jam, and popsicles. Even our chickens enjoyed some strawberries:
If you'd like to find a place in your area to pick strawberries from, check out Pick Your Own. It's our go to for finding local pick-your-own farms. I can't wait to go back for the next season of fruit, perhaps blueberries, raspberries or peaches.
Tuesday, April 12, 2011
Cinnamon Raisin Bread - my new attempt at bread
What's this? I made bread? And it was semi-successful? It's a miracle! It was only semi-successful because while it came out like a regular size loaf and actually did rise, I had to double the recipe to make it work. This recipe was suppose to make two loafs but mine only made one. It was delicious though. I made cinnamon swirl bread and added raisins making cinnamon raisin bread. I used the recipe in my trusty Better Homes and Gardens Red Cook Book
Thursday, April 7, 2011
First harvest of 2011
We have our first harvest of this year: radishes! I was able to pick a few for taste testing last week and this week we are radish central.
I can just eat them as is but last night with our first real harvest we had spicy turkey tacos with pepper-jack cheese, avocado and radish from the garden. It was wonderful. Along with the radishes, our lettuce is getting bigger by the day and our snap peas are about 1 foot tall now. And along with the garden, weeds are growing like crazy too. We have dandelions all over and a few bad non-native plants taking over: Japanese Honeysuckle, Multiflora Rose and Periwinkle. Lewie's been working hard to erratic these plants from our acreage although this will be a few years struggle and constant battle. And while it seems like the honeysuckle is everywhere, it could be worse, we could have kudzu, thank goodness we don't. Unfortunately, while these plants looks nice because they are some of the first to green in the spring and really make things colorful they are making it hard for our native plants to grow so by pulling up each one and planting a mix of native seeds in its place we are hoping to better our woods and Tennessee. Besides planting native seeds, we'll soon be planting more in the garden too. Our last frost date is April 15 and our zone is 7a so pretty soon we'll be adding our tomatoes/peppers/eggplant to the outside garden. I also started most of our herbs inside but they aren't doing very well. I can always start them by seed outside but I wanted to see what would happen if I tried to start them inside. I don't mind experimenting, in fact, I enjoy it and we'll be doing a lot of experimenting this summer because it's a new house with new soil in a new zone.
Thursday, March 31, 2011
Make It Yourself: Homemade Bread
Here is a picture of some bread I attempted to make last year:
So sad, it didn't rise. I have bread problems. This is another thing I'd love to start making in our house instead of buying. The nice whole-wheat-big-slice-sandwich-bread we like is pricey! Yet, the few times I've tried to make nice bread it hasn't worked. I can do quick breads and rolls but that's about it. Emma from City Roots, County Life seems to have the whole bread making thing down. It's hopeful to see other people try and succeed in bread making, perhaps I should try it again? She's joining the Make It Yourself month with the last post in the series all about bread. I love what their blog is all about: "First, it is the story of our transformation from a suburban family to a country family. But more importantly, we want this site to be both a resource and an inspiration to others who are thinking about making the move out to the country. We truly believe that living in the country is what we’re being called to do, but that doesn’t make it any less scary. If you’re a family considering making the shift to a more rural, simplified, and self-sustaining life, we hope that our tales here will give you hope that if two city slickers like us can make it work, surely most anyone can." Check it out and in the meantime here is Emma:
When Danielle asked me to guest post for her series on Make It Yourself, I was completely flattered. I am anything but an expert about making bread from scratch and I've certainly had a handful of failures. However, I've definitely learned that you can't expect to be perfect at something the first (few many) times around and often it's the journey that teaches you more than a recipe in a book will.
That being said, I highly encourage everyone to try making bread, from scratch, at home. I am not really known for being much of a baker, I'm more of a "cooker" as I have a distinct proclivity to change recipes as I go. Baking, however, doesn't really work like that, so I've had to be pretty disciplined about following the recipe. If you do follow the directions, you'll have a blast!
The internet is a wonderful resource if you're looking to dive into bread making. There are hundreds and hundreds of recipes out there and as many blogs dedicated to explaining how and why baking works the way it does. So far I've stuck to recipes that were specifically recommended to me or found poking around online. A couple you might try are listed below and contain links to my specific posts with photos, notes, and the original recipe:
Crusty White or Wheat Bread
Artisan Bread in 5 Minutes a Day
Amish White Bread
Here are a couple of tips that I have picked up so far:
- Read the directions. The entire thing. Start to finish, so you know what to expect. I always neglect to realize how long it takes when you include mixing, rising, punching, forming, and rising again. Look at your schedule and plan it out. If you want fresh bread with dinner at 6pm, you probably need to start before 3pm unless you've got the Artisan dough in the fridge. Plan ahead and make sure you have your ingredients together.
- If you live in a cool climate (or it's winter), have a warm place you can let your dough rise. Our thermostat is usually set about 72* so that's plenty warm for my bread to rise nice and high. If you leave your inside temperature around 50* though, you'll need to plan ahead! I've read of people turning the oven on "warm" and letting it preheat a few minutes, then prop the door open and let your bread rise in there.
- Preheat the oven. Give your oven a solid 20 minutes to preheat so the temperature is even and prepared for your loaves. It makes a big difference.
- If you want a crunchy crust, take a small pan (I use an 8x8" brownie pan) and put it in the oven on the lower rack while preheating. When you put the loaves in the oven, pour a cup of hot water into the brownie pan. It'll bubble and steam and help create a crispy crust on your bread.
- Give your bread at least a little time to cool. We have a tendency to want to break into the loaves as soon as they're out of the oven. While nothing beats bread still hot from the oven, the loaves will hold together better and slice easier if you let it cool a bit.
- The next time you buy bread from the store (I still do it, I haven't replaced all our bread-eating yet), save the large plastic bags and twist ties that they come in. My loaves tend to be too large to fit in a ziploc bag neatly and it's handy to have bread-sized bags stashed in the pantry for use. Just dump out the crumbs and you can reuse them over and over again. Homemade bread doesn't have the preservatives in it to keep it moist, so if you're storing any over night (and especially if you live in a drier climate, keep the bread in a bag until use. You will lose some of the crispy crust, but I'd rather have moist bread than crunch.
- And lastly, keep trying! Everyone has their own preferences on how they like their bread -- light and fluffy, dense and dark. Sourdough. Buttermilk. Herbs. White or wheat. I try to make a recipe three times before putting it on the shelf. This way I can (hopefully) isolate a mistake on my side and know if I really care for the recipe or not. I haven't found my all-time-favorite yet, but I am a fan of the artisan bread and have a batch in the fridge as we speak.
If you're looking to save money, making your own bread at home is a great way to do that! There are 4 basic ingredients in bread recipes, plus an extra here or there depending on the variety (ie - often sugar or honey). Here's the basic cost break down:
- Most recipes call for between 5 and 6 cups of flour. If you're just using standard, generic, all purpose flour this comes out to about 2 pounds. Add in some spillage, flour to dust your counter tops and rolling pin, and you can easily get 2 batches out of a 5 pound bag of flour. At about $2.50 per bag, that's about $1.25 in flour per recipe (often for 2 loaves). If you go through a lot of flour, you can get a 50 pound bag from a bulk warehouse store for about $11.50. That drops your per-loaf flour cost to $0.60.
- Yeast in individual packets are running $1.45 per pack of 3 here, so adjust for one or two packets per recipe depending on how much yeast is called for. Again, bulk is your friend and two pounds of yeast will run you $3.99 and make umpteen (likely hundreds of) loaves of bread and save you big time on your yeast expense.
- Water -- basically free from the tap. I'm not even sure how to calculate the cost for 3 cups of water. =P
- Salt -- A standard sized (26 ounce) canister of salt from the grocery store runs right at $1.00. You can get bulk non-iodized salt for $3.45 for 25 pounds, so your 1 -2 Tablespoons of salt will cost you pennies ... maybe.
When it's all said and done, you'll probably spend about $2.00 for 2 loaves of bread if you're buying standard items from the grocery store -- closer to $0.80 or $1.00. Comparing that to $3.29 for a standard, boring, store-bought loaf of bread and you'll save money nearly every time. And make your house smell wonderful in the process!
I hope this has encouraged you to hit up your pantry and make some bread! Remember, it doesn't have to look perfect to be delicious, to make your house smell divine, and to make a killer french toast for breakfast. =) I've love to get some feedback from you if you take the plunge!
Tuesday, March 29, 2011
Make It Yourself: Ice Cream
We attempted to make our own ice cream last year and it didn't work so well. It was messy, expensive and hardly ever worked right. It was discouraging - we ended up selling our ice cream maker and continue to this day to buy store bought. With summer coming though I'd like to break the habit and start making our own again. Robin from Our Semi Organic Life may have encouraged me. She and her husband make homemade ice cream and just seeing the pictures on her blog made me want to run out and buy a new ice cream machine. I was thrilled when she said she would share her ice cream making experience this month on Make It Yourself. Along with making ice cream Robin also posts about their newlywed life being healthy, happy with laughter, cooking & their cat on her blog. Check it out!
Here is Robin:

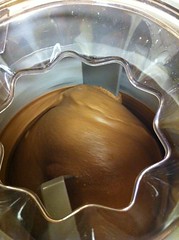
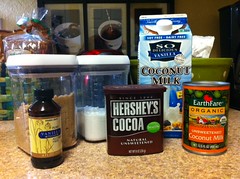
A scrumptious DIY ice cream is easy to make and can be really fun! We've tried a bunch of types of recipes but like this one the best! Since we're going somewhat dairy free in our household we made ours with 'So Delicious' brand vanilla coconut milk. You can use regular milk.
We love making homemade ice cream and haven't purchased store bought stuff in years! We like how you can control what goes in it and since we're 'semi organic' we like to add as many organic ingredients as we can. That means every time it's different and awesome! Another thing that's great is how cheap it is! Just check out the freezer section at your local store and gasp at how much some people pay for tubs full of chemicals and factory made flavors. Don't be a sucker! It's really easy and normally you'll just need to grab extra milk since you may already have the other ingredients.
- 1 cup unsweetened cocoa powder
- 2/3 cup granulated sugar
- 1/2 cup firmly packed brown sugar
- 1 1/2 cups 'So Delicious Coconut Beverage'
- 3 1/4 cups (about 2 cans) Coconut milk (not light coconut milk)
- 1 tablespoon pure vanilla extract
Before starting, make sure you follow your machine's instructions, which usually includes freezing the mixing bowl overnight!
Place the cocoa & sugars in a bowl & stir. Add the So Delicious and use a mixer or whisk to combine until the solids are dissolved (about 1 min).
Stir in the coconut milk & vanilla. Turn on ice cream machine & pour the mixture into the frozen bowl. It takes about 20-30 minutes until it's soft and creamy. At this point it's perfectly edible! For a firmer texture, transfer to an airtight container & freeze for 2 hours or more. Remove from freezer 15 minutes before serving.
![]() |
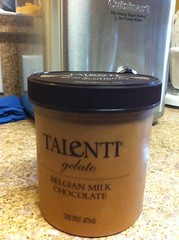
| We packaged it in a leftover plastic ice cream tub from another gelato brand called Talenti. |
Enjoy!
Wednesday, March 16, 2011
St. Patrick's Day Stout Cupcakes
Yes, that's right, stout cupcakes with a stout sugar icing,
and they actually have real beer in them.
Happy St. Patrick's Day everyone!
Tuesday, March 15, 2011
Make It Yourself: Breakfast Granola
This is a combination of several of my favorite granola recipes that I love. It's so nice to be able to make a large batch of this and have it in the pantry ready for breakfast or a snack.
Ingredients:
3 1/2 cups rolled oats
1/2 cranberries
1/2 cup raisins
1/4 cup shelled sunflower seeds
1/4 cup flax seeds
1/4 sesame seeds
1 teaspoon ground cinnamon
1 teaspoon ground ginger
1/2 cup light olive oil
1/2 pure maple syrup
1/2 local honey
1. Mix together oats, cranberries, raisins, sunflower seeds, flax seeds, cinnamon, and ginger.
2. Once mixed, add oil, syrup and honey.
3. Mix very well.
4. Evenly spread onto a large baking pan that is lined with aluminum foil.
5. Bake at 300ºF for 30-40 minutes until it starts to become fragrant and is slightly golden in color. Don't over cook!
6. Let cool for 5 minutes then break off into pieces or crumble. Store in a airtight container.
I'm not sure if it's cheaper to make granola at home than it is to buy it pre-made at the store but I assume it is. Even if it isn't, or close to the same price, I enjoy making granola because I can add whatever I want to it (nuts, dried strawberries, etc), or whatever I have extra in the pantry. I also like that that I can control what type of sugar goes into our cereal. Of course, this year I've been able to make some with our own maple syrup which has been wonderful and it's so nice to be able to use that and know that we aren't eating granola with high fructose corn syrup. Not only is is great for our family but a few years ago my mom made several batches of her homemade granola for Christmas presents which I think I may have to do this year.
Monday, February 14, 2011
Happy Valentine's Day!
Everyone needs something sweet for Valentine's Day. I attempted to make heart-shaped Valentine's cupcakes like these last night. Instead of using a heart shaped cupcake pan, Ohdeedoh explained you can do the same thing with a marble. Just slide the marble between the pan and the paper and your cupcake will bake in the shape of a heart. I didn't have any marbles so I used pie weights and it didn't work very well. Only a few held the shape of a heart, but when it did work it turned out very cute! Oh well, they still taste the same! Yummy vanilla chocolate goodness on Valentine's Day.
Happy Valentine's Day everyone!
Thursday, February 3, 2011
Freezer lunches
I was feeling a little nostalgic this past week thinking about our time in New Mexico and decided to make freezer burritos New Mexico style for future lunches. They go along with our plans of buying less and making more. Freezer burritos are perfect for work lunches and also for weekends when you don't feel like cooking. They taste good and are pretty easy on the wallet. Here are two of the recipes I use: My black bean and green chili burrito and a "tamale" burrito.
Black Bean & Green Chili Burrito
This is a meatless burrito because there is already lot of protein in the beans.
8 large tortillas
4 cans of organic black beans
3 small cans of diced green chili's
Cheddar cheese (optional)
1 onion diced
2 cloves of garlic diced
Olive oil
1 tablespoon of red chili powder (I make my own with dried red chili's and a grinder)
1/2 tsp garlic powder
1/4 tsp onion powder
1/4 tsp oregano
1/2 tsp smoked paprika
2 tsp cumin
2 tsp salt
Start by heating a large pan with a small amount of olive oil. Add onion and garlic. Cook until soft. Add black beans. Add chili powder, garlic powder, onion powder, oregano, paprika, cumin and salt. Simmer until beans are soft and fragrant. Taste. Add more seasonings if you desire. Turn off heat and let cool. Once cool, take one tortilla and add several large spoonfuls of black bean mix. Top with a few slices of cheese and several small spoonfuls of green chili's. Wrap in foil or saran wrap and freeze. This recipes makes about 8 tortillas.
"Tamale" Burrito
This recipe uses shredded pork like you would cook for a tamale and is so flavorful that you don't need masa or anything else with it.
6 lbs pork shoulder
9 cups of water
3 tablespoons of sugar
3 tablespoons of salt
1/2 cup red chili powder (I make my own with dried red chili's and a grinder)
8 tortillas
In a large pot with a lid, add water, sugar and salt. Stir. Add pork shoulder. Cover and cook for four hours, turning it over once every hour. After four hours turn off your heat and let sit for at least 30 minutes. Start to take the meat out and shred the pork. In a skillet, using some of the broth from the meat, cook the meat in the skillet with the red chili powder. Allow the meat to get a little bit brown but don't let it dry out. Taste. Add more seasonings if desired. When you are finished, add a heaping serving to a tortilla. Wrap in foil or saran wrap and freeze. This recipe makes about 8 tortillas.
Another good burrito in New Mexico is the breakfast burrito. Once these are gone I believe I'll make some of those and hopefully post about them too.
Thursday, January 27, 2011
Maple syrup
It took almost a week and a lot of hard work but we have 100% pure maple syrup. And it came right out of our backyard. Amazing. It is so delicious it's hard to describe. It has a sweet maple flavor but also has just a hint of forest flavor, like you know it's the real thing. Despite lugging over 6 gallons of sap up from our woods everyday this week we only ended up with about 4 cups of maple syrup but we will savor every drop of it. It was a neat learning experience. After tapping the trees and collecting the sap I boiled the sap continuously on the stove for four days, adding more sap as it came out of the trees. Yesterday our weather changed and we didn't get any sap so I continued to boil it down until it changed colors and became more concentrated. At a certain temperature it becomes syrup and not sap and after it reached that I tested it with our hydrometer to make sure it had the right density. Then I filtered it through a wool cone to get rid of all the sugar crystals:
After it was filtered I canned it in mason jars. The cleanup was a bit busy with maple syrup on everything!
It's another one of those things that we love: being able to make something instead of buying it. We only tapped four trees this year and it was a success so I imagine next year we will expand to more taps.
After it was filtered I canned it in mason jars. The cleanup was a bit busy with maple syrup on everything!
It's another one of those things that we love: being able to make something instead of buying it. We only tapped four trees this year and it was a success so I imagine next year we will expand to more taps.
Subscribe to:
Posts (Atom)